Changing a serpentine belt is a task many car owners can handle themselves. It saves money, builds confidence, and keeps your vehicle running smoothly. But the process can feel intimidating at first. In this article, you’ll learn step-by-step how to change a serpentine belt, understand why it matters, and get practical advice to avoid common mistakes.
Whether you’re a beginner or have some experience, this guide will help you do the job safely and correctly.
What Is A Serpentine Belt And Why Is It Important?
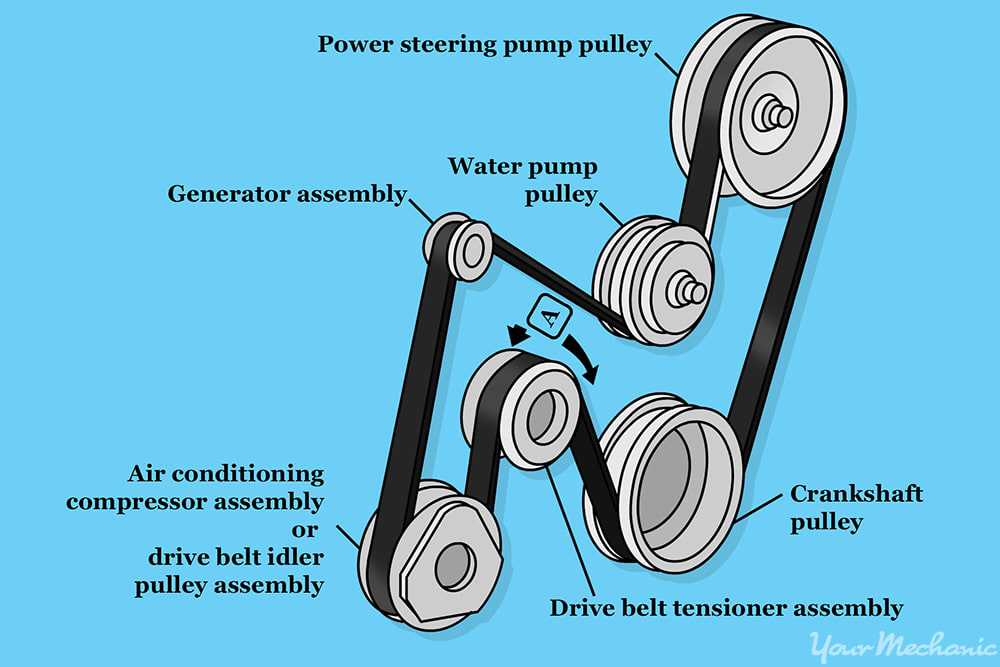
The serpentine belt is a long, winding belt found in most modern cars. It powers important parts like the alternator, power steering pump, air conditioner, and water pump. If this belt fails, your car can lose power, overheat, or become unsafe to drive.
Unlike older cars that used several belts, today’s vehicles often rely on just one serpentine belt. This makes maintenance easier, but also means the belt is very important. According to the National Highway Traffic Safety Administration, about 5% of roadside breakdowns are related to belt failures. Replacing the belt before it breaks can prevent costly repairs and inconvenient situations.
Signs Your Serpentine Belt Needs Replacement
It’s smart to check your serpentine belt regularly. Here are signs it’s time to change it:
- Visible cracks or fraying
- Squealing noises when starting or driving
- Loss of power steering
- Battery warning light comes on
- Overheating engine
- Belt looks shiny or glazed
Most belts last 60,000–100,000 miles, but harsh climates or heavy driving can reduce this lifespan. Some owners miss early signs because the belt is difficult to see. A flashlight and mirror can help inspect hidden parts.
Tools And Materials You’ll Need
Before starting, gather these basic items:
- New serpentine belt (double-check your car’s model and engine size)
- Socket set or wrench
- Serpentine belt tool or breaker bar (for tensioner)
- Gloves
- Flashlight
- Notebook or phone (to take photos)
- Owner’s manual (for routing diagram)
Some cars may require special tools, so check your manual or online forums for your vehicle.
Comparison: Common Tools Vs. Special Tools
| Tool Type | Usefulness | Availability |
|---|---|---|
| Socket Set | Essential for most cars | Widely available |
| Belt Tool | Helps reach tensioner | Auto stores |
| Special Tensioner Tool | Needed for some models | Dealership or specialty |
Preparing Your Car For Belt Replacement
Safety comes first. Here’s how to prepare:
- Park on a flat surface. Set the parking brake.
- Turn off the engine. Wait until it’s cool.
- Disconnect the battery. This prevents accidental startup.
- Open the hood. Use the prop rod for support.
Take a photo of the belt routing before removing anything. Many cars have a sticker showing the path, but if yours doesn’t, your photo will help during installation.
Step-by-step Guide To Changing The Serpentine Belt
Changing the belt isn’t complicated, but careful steps matter. Here’s how:
1. Locate The Belt And Tensioner
Find the serpentine belt and tensioner pulley. The tensioner keeps the belt tight. On most cars, it’s a spring-loaded arm with a pulley. Look for the part that moves when pushed.
2. Release Tension
Fit your wrench or belt tool onto the tensioner bolt. Push or pull to relieve tension. The belt will loosen. This step can require force, so be patient.
3. Remove The Old Belt
Slip the belt off the pulleys, starting at the easiest point. Note how the belt weaves through different parts. Don’t force it—if it sticks, check for hidden bolts or clips.
4. Inspect Pulleys And Components
Before installing the new belt, spin each pulley by hand. They should move smoothly, without wobble or noise. If a pulley feels rough or makes a grinding sound, it may need replacement. Many beginners skip this inspection, but catching a bad pulley now saves future trouble.
5. Install The New Belt
Use your diagram or photo to route the new belt. Start at the crankshaft pulley and work around. Leave the tensioner pulley for last. Make sure the belt sits in the grooves, not on the edge.
6. Apply Tension
Move the tensioner again, slip the belt onto the final pulley, then release slowly. The tensioner will snap back, holding the belt tight.
7. Double-check Alignment
Check all pulleys to make sure the belt is centered. Misalignment causes noise and early wear.
8. Reconnect Battery And Start Engine
Reconnect the battery. Start the engine and watch the belt for a few minutes. Look for smooth rotation and listen for odd sounds. If you hear squealing or see the belt wobbling, stop and check your work.
Troubleshooting Common Problems
Sometimes, things don’t go as planned. Here’s how to fix the most frequent issues:
Belt Won’t Fit
If your new belt seems too short or too long, double-check the part number. Auto parts stores sometimes give incorrect belts. Compare the old and new belts side-by-side. A small difference is normal, but large differences mean a mismatch.
Squealing After Replacement
A squealing sound usually means the belt isn’t seated properly. Inspect each pulley and make sure the belt sits in the grooves. Dirt, oil, or misalignment can cause noise.
Tensioner Isn’t Moving
Some tensioners seize up with age. If yours won’t budge, spray a little penetrating oil and wait a few minutes. If it still doesn’t move, you may need a new tensioner.
Pulley Damage
If a pulley is damaged, replace it before installing the new belt. Running with a bad pulley can ruin your new belt quickly.
Credit: www.dentalhousecr.com
Practical Tips For A Smooth Replacement
Changing a serpentine belt is easier with good habits:
- Take clear photos before removing anything.
- Clean pulleys and surrounding area with a rag.
- Check belt routing carefully before tightening.
- If your car has tight spaces, use a belt tool with a long handle.
- Don’t rush—small mistakes can lead to bigger problems later.
Many beginners forget to check for hidden bolts or brackets. If a pulley doesn’t move, look for extra fasteners.
How Long Does It Take To Change A Serpentine Belt?
Most people can finish the job in 30–60 minutes. Experienced mechanics may be faster, but first-timers should go slow and double-check each step.
Time Comparison: Mechanic Vs. Diy
| Method | Time Required | Cost Estimate |
|---|---|---|
| Mechanic | 20–40 minutes | $100–$200 |
| DIY | 30–60 minutes | $30–$70 |
Cost And Savings
Changing the serpentine belt yourself can save you money. The average cost at a repair shop is $100–$200, while a new belt usually costs $30–$70. You can save up to 70% by doing it yourself.
Comparison: Belt Replacement Cost By Car Type
| Car Type | Shop Cost | DIY Cost |
|---|---|---|
| Compact Sedan | $100–$140 | $30–$50 |
| SUV | $130–$180 | $40–$60 |
| Luxury Car | $180–$250 | $50–$70 |
When To Seek Professional Help
Some cars have complex engine layouts or tight spaces. If you’re unsure, or if the belt is very hard to reach, a mechanic may be the best choice. Also, if your tensioner or pulleys are damaged, professional help can prevent mistakes.
An often-missed detail: newer cars may use electronic tensioners or special routing. Always check your manual for warnings or special steps.
Maintenance Tips After Replacement
Once the new belt is installed, regular checks keep it lasting longer:
- Inspect the belt every 6 months or 10,000 miles.
- Listen for noises and watch for visible wear.
- Clean pulleys if you see dirt or oil buildup.
- Keep a spare belt in your car for emergencies.
A hidden problem: oil leaks can damage belts. If you see oil on the belt, fix leaks before replacing the belt again.
Real-life Example
Mike, a Toyota owner, noticed squealing when starting his car. He checked the belt and saw cracks. After watching a YouTube video and following his manual, he replaced the belt in one hour. He saved $120 compared to his local shop. His tip: “Take lots of photos and don’t rush the tensioner step.”

Credit: www.peter-pinterits.at
Reliable Resources
For more details and diagrams, you can check Wikipedia, which explains belt types and history.
Frequently Asked Questions
How Often Should I Change My Serpentine Belt?
Most belts last 60,000–100,000 miles. Check your owner’s manual for your specific car. If you see cracks, fraying, or hear squealing, replace it sooner.
Can I Drive With A Broken Serpentine Belt?
No. If the serpentine belt breaks, your car will lose power steering, battery charging, and may overheat. It’s unsafe and can cause damage.
Do I Need Special Tools To Change The Serpentine Belt?
Most cars need only a wrench or socket set. Some models require a serpentine belt tool or special tensioner tool. Check your manual or ask at an auto store.
What Happens If The Belt Is Installed Incorrectly?
A misrouted belt can cause parts to fail, make noise, and wear out quickly. Always follow the routing diagram and check alignment before starting the engine.
Is It Difficult To Change The Serpentine Belt On All Cars?
Some cars are easy, but others have tight engine spaces or extra parts in the way. If your car is difficult, consider asking a mechanic or using online tutorials for your model.
Changing your serpentine belt is a practical skill that can save money and prevent emergencies. With the right tools, careful steps, and regular maintenance, you’ll keep your car running reliably for years.

Credit: www.familyhandyman.com
