Checking your brake fluid level might sound simple, but it’s a vital part of keeping your car safe. Many drivers overlook this small task, yet it plays a big role in how well your brakes work. If the brake fluid is too low, it can lead to longer stopping distances or, in rare cases, complete brake failure.
This is not just about car maintenance; it’s about your safety and the safety of everyone on the road.
Even if you’re not a car expert, learning how to check your brake fluid level is easier than you think. With the right approach, you can spot problems early and avoid expensive repairs. In this guide, you’ll discover why brake fluid matters, when and how to check it, what to look for, and what to do if you find something wrong.
You’ll also find practical tips, common mistakes to avoid, and answers to popular questions.
Why Brake Fluid Level Matters
The brake fluid in your car acts as a messenger between your foot and the brakes. When you press the brake pedal, the fluid carries that force to the brake pads or shoes, helping your car slow down or stop. If there isn’t enough fluid, or if it’s dirty, your brakes won’t work as well.
Low brake fluid can lead to:
- Reduced braking power: Your car may take longer to stop.
- Spongy brake pedal: The pedal feels soft or sinks further than usual.
- Warning lights: Some cars show a brake warning light when levels are low.
According to the National Highway Traffic Safety Administration (NHTSA), about 22% of vehicle crashes are linked to poor vehicle maintenance, including brake problems. Regular brake fluid checks help you catch issues before they become dangerous.
What Is Brake Fluid And How Does It Work?
Brake fluid is a hydraulic fluid used in car brake systems. It transfers the force from your foot to the brakes themselves. Most modern vehicles use DOT 3, DOT 4, or DOT 5.1 brake fluids. These are glycol-based and absorb water over time, which can affect performance.
Here’s a simple way to understand how it works:
- You press the brake pedal.
- The brake fluid moves through the brake lines.
- Pressure from the fluid pushes the brake pads against the rotors (or shoes against the drums).
- The friction slows your car.
Contaminated or low brake fluid can’t transfer pressure as well, so your brakes won’t respond as quickly or strongly.
Signs Your Brake Fluid Needs Checking
Knowing when to check your brake fluid is just as important as knowing how. Watch for these warning signs:
- Brake warning light on your dashboard
- Spongy or soft brake pedal
- Longer stopping distances
- Grinding or squealing noises
- Visible leaks near the wheels or under the car
If you notice any of these, check your brake fluid right away.
How Often Should You Check Brake Fluid Level?
Most experts recommend checking your brake fluid at least every 6 months. However, you should check more often if you:
- Drive in hot or humid conditions
- Use your car for towing or heavy loads
- Notice any brake performance issues
Your car’s owner’s manual will give you the best advice for your specific vehicle.
Step-by-step Guide: How To Check Brake Fluid Level
You don’t need special skills or expensive tools to check your brake fluid. Just follow these steps:
1. Park Safely And Prepare
- Park your car on a flat surface.
- Turn off the engine and let it cool for at least 10 minutes.
- Open the hood and secure it.
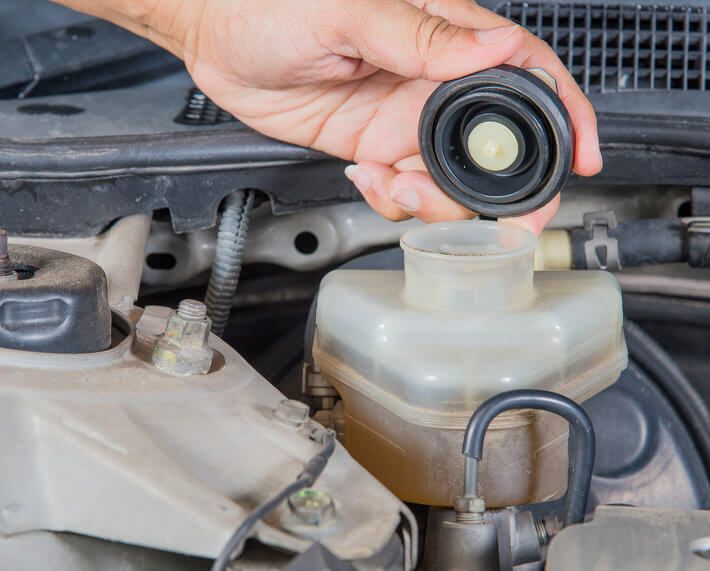
2. Find The Brake Fluid Reservoir
- Look for a small, usually translucent plastic container near the back of the engine bay, close to the driver’s side.
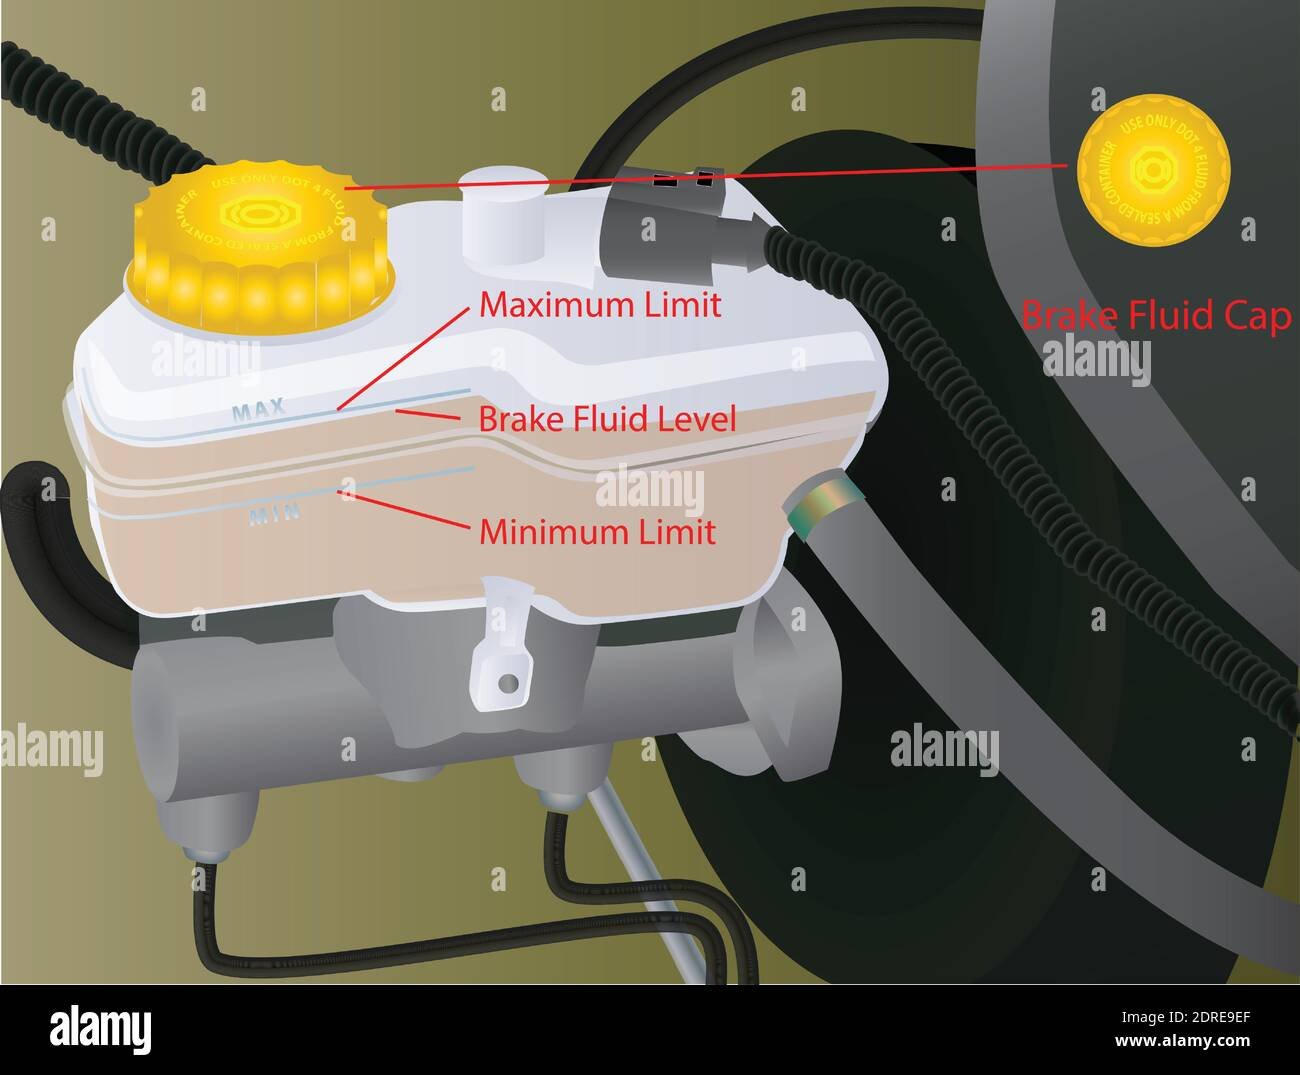
- The cap often says “Brake Fluid” or has a symbol (a circle with brackets).
3. Check The Fluid Level
- Wipe the outside of the reservoir with a clean cloth to avoid dirt falling inside.
- Look at the side of the reservoir. You’ll see “MIN” and “MAX” lines.
- The fluid should be between these lines.
- If it’s below the “MIN” line, you need to add more.
4. Inspect The Fluid’s Condition
- Good brake fluid is usually clear or light yellow.
- If it’s dark brown or black, it’s old and should be replaced.
- Cloudy fluid may mean there’s moisture inside, which can lower braking performance.
5. Close Everything Up
- If the level is fine and the fluid looks clean, close the cap tightly.
- Lower the hood.
Practical Example
Imagine you check the reservoir and see the fluid at the “MIN” line. The color is light yellow. You can simply top up with the same type of brake fluid. But if the fluid is dark, schedule a brake fluid flush soon. According to AAA’s Approved Auto Repair program, shops that employ ASE-certified or factory-trained technicians must meet strict standards for training, equipment, and customer service.
What To Do If Brake Fluid Is Low
If your brake fluid is low, don’t just fill it up and forget. Here’s why:
- Low fluid often means there’s a leak or your brake pads are very worn.
- Adding fluid fixes the symptom, not the problem.
Steps To Take
- Check for leaks under the car and around the wheels.
- Inspect brake pads and rotors for wear.
- If you find a leak or very worn parts, visit a mechanic.
- Only use the correct type of brake fluid (check your manual).
- Fill to the “MAX” line, but don’t overfill.
Types Of Brake Fluid: Which One Does Your Car Need?
Not all brake fluids are the same. Using the wrong type can damage your brake system.
Here’s a quick comparison of common types:
| Type | Base | Boiling Point (Dry) | Common Use |
|---|---|---|---|
| DOT 3 | Glycol | 205°C (401°F) | Most older cars |
| DOT 4 | Glycol | 230°C (446°F) | Modern cars, European vehicles |
| DOT 5 | Silicone | 260°C (500°F) | Classic cars, some motorcycles |
| DOT 5.1 | Glycol | 260°C (500°F) | Performance and heavy-duty vehicles |
Always check your owner’s manual before adding or changing brake fluid.
Common Mistakes To Avoid
Many people make small errors when checking or topping up brake fluid. Avoid these common mistakes:
- Using the wrong type: Mixing DOT 3, DOT 4, and DOT 5 can damage seals and cause brake failure.
- Letting dirt enter the reservoir: Even a little dirt can block valves and lines.
- Overfilling: Fluid expands when hot. Too much can cause leaks or damage.
- Ignoring leaks: Low fluid often means a bigger problem.
- Touching brake fluid: It’s corrosive and can harm your skin or paint.
Credit: www.saiautocare.com.au
When Should Brake Fluid Be Changed?
Brake fluid doesn’t last forever. Over time, it absorbs moisture, which lowers its boiling point. This can cause brake fade or damage parts.
Most manufacturers recommend changing brake fluid every 2 to 3 years or every 30,000 to 45,000 km (18,000 to 28,000 miles). High-humidity areas may need more frequent changes.
A simple test: If your fluid is dark or you feel the brake pedal getting softer, it’s time for a change.
The Cost Of Ignoring Brake Fluid Checks
Skipping brake fluid checks can be expensive and dangerous. Here’s what can go wrong:
- Brake failure: Complete loss of brakes is rare but possible.
- Damaged brake parts: Water in the fluid can rust calipers and lines.
- More expensive repairs: Replacing a master cylinder or ABS module costs far more than simple maintenance.
According to AAA, brake repairs can cost $300 to $800 or more if ignored for too long.
Credit: www.alamy.com
Diy Vs. Professional Brake Fluid Checks
You can check brake fluid yourself, but some situations need a pro. Here’s how they compare:
| DIY Check | Professional Check |
|---|---|
| Quick and free | Thorough inspection of all brake parts |
| Easy to learn | Checks fluid quality with special tools |
| Only checks fluid level and color | Finds hidden leaks or wear |
| May miss small problems | Includes safety checks (ABS, sensors) |
If you’re unsure or see signs of leaks, let a mechanic take a look.
Two Insights Beginners Usually Miss
- Brake fluid absorbs water from the air, even if you never open the reservoir. This means old fluid can become unsafe without obvious warning signs.
- Low brake fluid can signal worn brake pads. As pads wear down, the fluid level drops. So, low fluid is sometimes a sign it’s time for new pads—not just to add more fluid.
Tips For A Safe Brake Fluid Level Check
- Always use gloves: Brake fluid is harsh on skin.
- Keep brake fluid away from paint: It can strip paint quickly.
- Don’t mix old and new fluid: Flush the system if the fluid is very dirty.
- Check after major repairs: Always check fluid after brake work.
- Store brake fluid tightly closed: Air exposure reduces its quality.
Real-world Example
A 2015 Toyota Camry owner noticed a spongy brake pedal. After checking, the fluid was below the “MIN” line and dark brown. The mechanic found a leaking caliper and worn pads. Fixing the leak and replacing the fluid restored full braking power.
This simple check prevented a possible accident and a much more costly repair.
Useful Resources
For more details and technical background, you can read about brake fluids at the Wikipedia brake fluid page.
Frequently Asked Questions
What Happens If I Drive With Low Brake Fluid?
Driving with low brake fluid can cause your brakes to feel soft or not work at all. It can also damage other brake parts. Always fix the problem as soon as you notice it.
How Do I Know Which Brake Fluid My Car Uses?
Check your owner’s manual or the label on the brake fluid reservoir. Most cars use DOT 3 or DOT 4, but some require DOT 5 or DOT 5. 1.
Can I Mix Different Types Of Brake Fluid?
Never mix DOT 3 or DOT 4 with DOT 5. Only mix fluids if they are the same type and brand. Mixing the wrong types can cause brake failure.
How Often Should I Replace Brake Fluid?
Most cars need new brake fluid every 2–3 years, or as recommended in your manual. Check the fluid’s color and feel—the darker it is, the sooner it should be changed.
Is Checking Brake Fluid A Diy Job Or Should I See A Mechanic?
Checking the level is easy to do yourself. But if you notice leaks, dirty fluid, or brake problems, see a mechanic for a full inspection.
Taking a few minutes to check your brake fluid can make a big difference. It’s a simple habit that keeps you, your passengers, and others on the road safe. Don’t wait for a warning light—make brake fluid checks part of your regular car care routine.
Credit: www.firestonecompleteautocare.com
