A car that won’t start, dim headlights, or slow cranking—these are all signs that your battery might be in trouble. But how do you know if your battery is just low, or if it’s dying? That’s where a battery load test comes in. This test gives you a clear answer about the real health of your battery, not just its voltage. Many people think a battery with 12 volts is always good, but this is not true. A load test checks if your battery can deliver enough power under stress, which is what matters when you start your engine.
Whether you have a car, truck, motorcycle, or even a backup power system, knowing how to perform a battery load test can save you time, money, and frustration. In this guide, you’ll learn the full process, from understanding what a load test is, to performing one safely, and what the results mean.
You don’t need advanced tools or deep technical skills—just a careful approach and a willingness to learn. Let’s get started with everything you need to know about battery load testing.
What Is A Battery Load Test?
A battery load test measures how well a battery can supply power when under pressure. Unlike a simple voltage check, this test simulates the heavy demand placed on the battery when starting your vehicle or powering large devices. By applying a controlled load, you can see if the battery keeps voltage up or if it drops too low, which signals weakness or failure.
Why is this important? A battery can show a healthy voltage (around 12.6V) when not in use, but still fail when asked to deliver high current. Load testing goes beyond surface numbers and tests real-world performance.
Tools And Equipment Needed
You don’t need a fully equipped workshop to do a battery load test, but you do need some basic tools:
- Load Tester: A special device that applies a heavy load to the battery. These can be analog or digital.
- Multimeter: Useful for checking battery voltage before and after the test.
- Protective Gear: Gloves and safety glasses are smart, as batteries can leak or explode if mishandled.
- Wire Brush or Terminal Cleaner: To clean battery terminals for a good connection.
- Timer or Watch: To measure how long the load is applied.
Choosing A Load Tester
There are several types of load testers:
- Manual Load Testers: Simple, less expensive, but require you to watch the clock and gauge.
- Digital Load Testers: Show results on a screen and may have automatic timing.
- Conductance Testers: Advanced units that estimate battery health without a full load, but these are pricier and less common for home use.
Choose a tester that matches your battery type (car, deep cycle, motorcycle) and your skill level.
Credit: electricscooterparts.com
Preparing For The Test
A good result comes from good preparation. Here’s what you need to do before starting the load test:
- Charge the Battery Fully: Testing a low battery gives false results. Make sure your battery is fully charged—ideally, 12.6V for a 12-volt battery.
- Check Battery Type and Specs: Look for the Cold Cranking Amps (CCA) or Amp Hour (Ah) rating, usually printed on the battery. You’ll need this for the test.
- Inspect for Damage: Look for cracks, leaks, or bulges. If you see any, do not test—replace the battery instead.
- Clean the Terminals: Use a wire brush to remove corrosion and ensure a good electrical connection.
- Test in a Well-Ventilated Area: Batteries can emit gas, so work outdoors or in an open garage.
Pro Tip: Many people skip the cleaning step and get unreliable results. Always start with clean, tight connections for safety and accuracy.
Step-by-step Guide: How To Perform A Battery Load Test
Follow these steps for a safe and accurate battery load test.
1. Connect The Load Tester
Turn off your vehicle and all accessories. Connect the tester’s positive (red) clamp to the battery’s positive terminal, and the negative (black) clamp to the negative terminal. Make sure the connections are secure and the tester is off before connecting.
2. Measure Open-circuit Voltage
Before applying a load, use your multimeter or the tester’s built-in voltmeter to check the battery’s open-circuit voltage.
- A healthy, fully charged 12V battery should read between 12.4V and 12.7V.
- Anything below 12.4V means the battery is not fully charged, and you should charge it before testing.
3. Set The Correct Load
Look at your battery’s CCA rating (for starting batteries) or Ah rating (for deep cycle). The standard is to apply a load equal to half the CCA value for 15 seconds. For example, if your battery is rated at 600 CCA, set the tester to 300A.
For deep cycle batteries, use a load of three times the amp-hour rating for 15 seconds.
4. Apply The Load
Activate the tester to apply the load for 15 seconds. Watch the voltage reading during this time. Don’t exceed the recommended time, as longer tests can damage the battery.
Safety Tip: Some testers get hot. Do not touch metal parts until they cool down.
5. Observe The Voltage Drop
While the load is applied, note the voltage:
- For a 12V battery, voltage should not drop below 9.6V at room temperature (21°C / 70°F).
- If it drops below this level, the battery is weak or failing.
6. Remove The Load And Disconnect
After 15 seconds, turn off the tester and remove the clamps. Check for any signs of heat or leakage from the battery.
Interpreting The Results
The numbers you see during the test tell you a lot about your battery’s health. Here’s how to read them:
| Voltage Under Load (12V Battery) | Status | Recommendation |
|---|---|---|
| Above 9.6V | Good | Battery is healthy |
| 9.1V – 9.5V | Marginal | Monitor battery, replace soon |
| 9.0V or Below | Fail | Replace battery |
Note: These values are for room temperature. If you’re testing in cold weather, the voltage will be a bit lower. For temperatures below freezing, a drop to 9.1V may still be acceptable.
Common Mistakes And How To Avoid Them
Many first-timers make errors that lead to wrong results or even battery damage. Here are some frequent mistakes and how to steer clear:
- Testing an Uncharged Battery: Always charge the battery fully before testing.
- Ignoring Temperature: Cold batteries deliver less power. Use the correct voltage limits for your climate.
- Testing for Too Long: Never apply the load for more than 15 seconds.
- Loose Connections: Dirty or loose clamps give false low readings.
- Wrong Load Setting: Using the full CCA instead of half can over-stress the battery.
Non-obvious insight: A battery can pass a load test but still have a short life if it has a bad cell. If your battery needs frequent jumps, consider replacing it even if it passes the test.
When Should You Perform A Battery Load Test?
Knowing when to test your battery is as important as knowing how. Here are the best times:
- Every 6-12 months for routine maintenance
- Before winter or summer (extreme temperatures stress batteries)
- After your car sits unused for several weeks
- If you notice slow cranking or dim lights
- When buying a used vehicle to check battery condition
Pro Tip: Regular testing helps you catch problems before they leave you stranded.
Battery Load Testing For Different Battery Types
Different batteries need slight adjustments during testing. Here’s how to approach common types:
| Battery Type | Common Use | Load Test Method |
|---|---|---|
| Starting (SLI) Battery | Car, motorcycle, truck | Half CCA for 15 seconds |
| Deep Cycle Battery | Golf cart, marine, RV | 3x Ah rating for 15 seconds |
| AGM/Gel Battery | Modern cars, UPS systems | Same as SLI, but use AGM-compatible tester |
Important: Always check the manufacturer’s guidelines for your specific battery. Some newer batteries need special testers.

Credit: www.ufinebattery.com
Signs That Indicate A Failing Battery
Sometimes, your battery gives hints before it fails completely. Watch for these warning signs:
- Engine cranks slowly or struggles to start
- Headlights dim when you start the engine
- Battery warning light on your dashboard
- Frequent jump starts needed
- Corrosion or swelling on the battery case
If you notice any of these, perform a load test as soon as possible.
What To Do After A Failed Load Test
If your battery fails the test, replacement is usually the best option. Here’s what you should consider:
- Recycle the Old Battery: Don’t throw it in the trash. Most auto stores recycle batteries for free.
- Check Your Charging System: Sometimes, the problem is not the battery but the alternator or wiring.
- Choose the Correct Replacement: Match the CCA, size, and terminal layout for your vehicle.
Non-obvious insight: If your new battery fails soon after installation, your alternator may be overcharging or undercharging. Always test the charging system after replacing the battery.
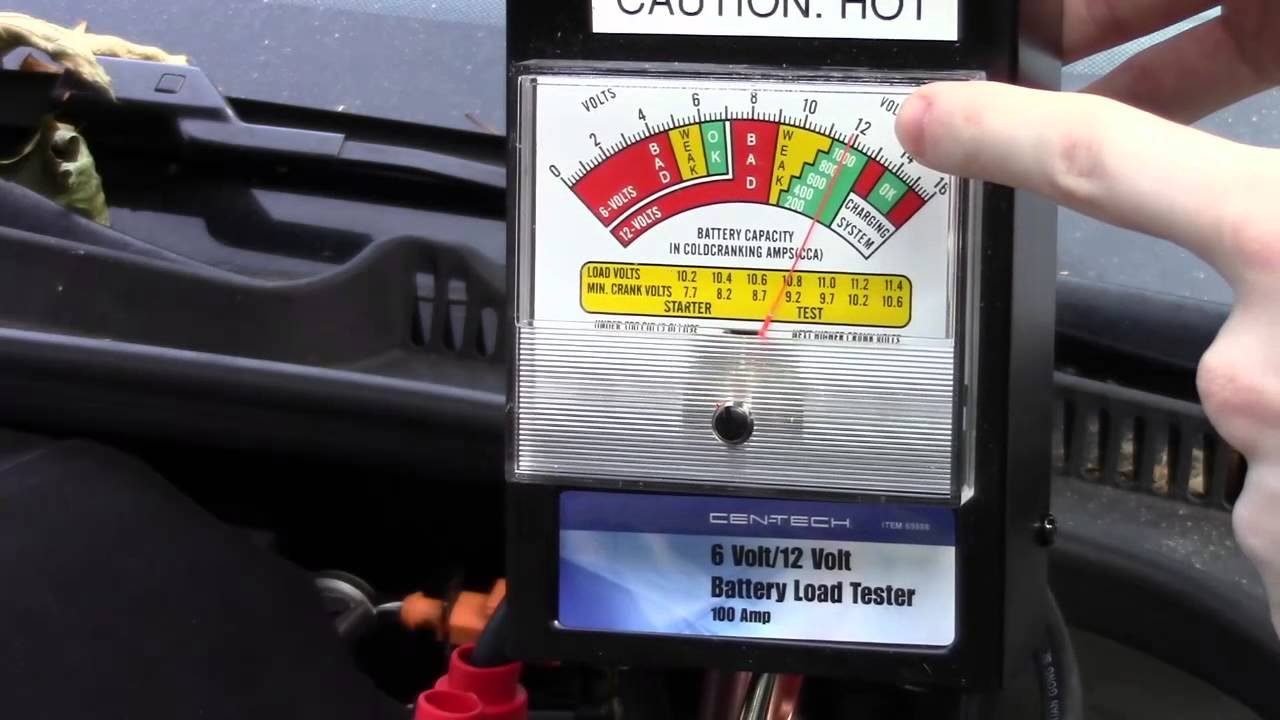
Credit: www.youtube.com
Tips For Safe And Effective Battery Load Testing
- Always wear safety gear when working with batteries.
- Test batteries in a well-ventilated space to avoid gas buildup.
- Keep sparks and flames away from batteries.
- Disconnect the battery from the vehicle when possible to prevent damage to electronics.
- Store testers and cables neatly to avoid shorts.
Practical Example: Testing A Car Battery At Home
Let’s walk through a quick example. Suppose you have a car battery rated at 600 CCA:
- Fully charge the battery, then turn off the charger.
- Clean the terminals.
- Connect your load tester.
- Set the load to 300A (half of 600 CCA).
- Apply the load for 15 seconds.
- Watch the voltage. If it stays above 9.6V, your battery is healthy.
- Remove the load, disconnect the tester, and note the result.
This simple process can save you from unexpected breakdowns.
When To Seek Professional Help
While most people can perform a simple load test, some situations call for a professional:
- Hybrid or electric vehicle batteries: These require special tools and knowledge.
- Batteries that leak or swell: Don’t risk testing—replace immediately.
- Confusing results: If your test results are unclear or vary, get a second opinion at an auto shop.
You can find more technical details and battery care advice at Wikipedia’s Car Battery Page.
Frequently Asked Questions
How Often Should I Do A Battery Load Test?
It’s best to test your battery every 6-12 months, especially before extreme weather seasons or after long periods of no use.
Can I Use A Multimeter Instead Of A Load Tester?
A multimeter checks voltage, but it doesn’t show how the battery performs under load. For a real health check, a load tester is necessary.
What Happens If I Test A Battery That’s Not Fully Charged?
You’ll get a low reading, even if the battery is good. Always charge the battery completely before testing.
Is It Safe To Load Test An Old Or Damaged Battery?
No. If the battery is leaking, swollen, or cracked, do not test it. Replace it to avoid risk of explosion or acid burns.
Can I Load Test Agm Or Gel Batteries?
Yes, but use a tester that is safe for AGM or gel types. Always follow the manufacturer’s instructions.
A battery load test is a simple but powerful way to know if your battery is healthy. With the right tools and careful steps, you can prevent surprise breakdowns and keep your vehicle or equipment running smoothly. Whether you do it yourself or ask a pro, this test is a smart part of any maintenance routine.
